Licensing
!!
A Spine license is [required](/git/spine-runtimes/spine-unity#licensing) to integrate the Spine Runtimes into your applications.
spine-unity Runtime Documentation
!!
* [Installation](/spine-unity-installation)
* [Examples](/spine-unity-examples)
* [Assets](/spine-unity-assets)
* [Main Components](/spine-unity-main-components)
* [Utility Components](/spine-unity-utility-components)
* [Rendering](/spine-unity-rendering)
* [Timeline Extension UPM Package](/spine-unity-timeline)
* [On-Demand Loading Extension UPM Packages](/spine-unity-on-demand-loading)
* [FAQ](/spine-unity-faq)
!!
# Utility Components
## SkeletonRootMotion
spine-unity supports root motion on all three Spine skeleton components. The `SkeletonRootMotion` component can be attached to [SkeletonAnimation](/spine-unity-main-components#SkeletonAnimation-Component) and [SkeletonGraphic (UI)](/spine-unity-main-components#SkeletonGraphic-Component) GameObjects, while a separate [SkeletonMecanimRootMotion](#SkeletonMecanimRootMotion) component is provided for [SkeletonMecanim](/spine-unity-main-components#SkeletonMecanim-Component). Attaching this root motion component is similar to enabling the `Apply Root Motion` parameter at the Unity Mecanim [`Animator`](https://docs.unity3d.com/Manual/class-Animator.html) component. When enabled, the character's position is driven by the animation according to the movement of the selected `Root Motion Bone`.
> **Note:** There is a [SkeletonMecanimRootMotion](#SkeletonMecanimRootMotion) component provided for [SkeletonMecanim](/spine-unity-main-components#SkeletonMecanim-Component) objects. `SkeletonRootMotion` will fail when used on `SkeletonAnimation` or `SkeletonGraphic (UI)` components.
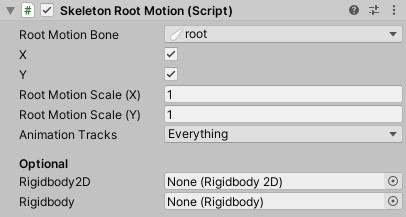
**Parameters**
- *Root Motion Bone.* The target bone whose movement is used as root motion.
- *X.* When enabled, movement along the local X axis is applied as root motion.
- *Y.* When enabled, movement along the local Y axis is applied as root motion.
- *Root Motion Scale (X).* Scale applied to the horizontal root motion delta. Can be used for delta compensation to e.g. stretch a jump to the desired distance.
- *Root Motion Scale (Y)* Scale applied to the vertical root motion delta. Can be used for delta compensation to e.g. stretch a jump to the desired height.
- *Animation Tracks.* Allows you to specify which [animation tracks](/spine-applying-animations#Tracks) shall be included in root motion calculations.
**Optional Parameters**
- *Rigidbody2D.* When a `Rigidbody2D` is assigned, movement is applied via physics to the given `Rigidbody2D` instead of the `Transform` component. It is then recommended to set the skeleton animation component's [`Advanced` - `Animation Update`](/spine-unity-main-components#Setting-Advanced-Parameters) Inspector parameter to `In FixedUpdate`.
- *Rigidbody.* When a `Rigidbody` is assigned, movement is applied via physics to the given `Rigidbody` instead of the `Transform` component. It is then recommended to set the skeleton animation component's [`Advanced` - `Animation Update`](/spine-unity-main-components#Setting-Advanced-Parameters) Inspector parameter to `In FixedUpdate`.
> **Note:** The `SkeletonRootMotion` class provides `AdjustRootMotionToDistance()` and other methods to allow for easy delta compensation. Delta compensation can be used to e.g. stretch a jump to a given distance. Root motion can be adjusted at the start of an animation or every frame via `skeletonRootMotion.AdjustRootMotionToDistance(targetPosition - transform.position, trackIndex);`.
## SkeletonMecanimRootMotion
This component is a variant of the [SkeletonRootMotion](#SkeletonRootMotion) component to be used with [SkeletonMecanim](/spine-unity-main-components#SkeletonMecanim-Component) components.
The `SkeletonMecanimRootMotion` component is automatically added to your skeleton GameObject when the `Apply Root Motion` parameter at the Unity Mecanim [`Animator`](https://docs.unity3d.com/Manual/class-Animator.html) is enabled. To remove the `SkeletonMecanimRootMotion` component you have to ensure to disable the Animator's `Apply Root Motion` parameter first.
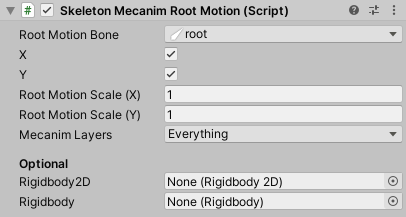
**Parameters**
- *Root Motion Bone.* The target bone whose movement is used as root motion.
- *X.* When enabled, movement along the local X axis is applied as root motion.
- *Y.* When enabled, movement along the local Y axis is applied as root motion.
- *Root Motion Scale (X).* Scale applied to the horizontal root motion delta. Can be used for delta compensation to e.g. stretch a jump to the desired distance.
- *Root Motion Scale (Y)* Scale applied to the vertical root motion delta. Can be used for delta compensation to e.g. stretch a jump to the desired height.
- *Mecanim Layers.* Allows you to specify which [Mecanim layers](https://docs.unity3d.com/Manual/AnimationLayers.html) shall be included in root motion calculations.
**Optional Parameters**
- *Rigidbody2D.* When a `Rigidbody2D` is assigned, movement is applied via physics to the given `Rigidbody2D` instead of the `Transform` component.
- *Rigidbody.* When a `Rigidbody` is assigned, movement is applied via physics to the given `Rigidbody` instead of the `Transform` component.
> **Note:** The `SkeletonMecanimRootMotion` class provides `AdjustRootMotionToDistance()` and other methods to allow for easy delta compensation. Delta compensation can be used to e.g. stretch a jump to a given distance. Root motion can be adjusted at the start of an animation or every frame via `skeletonRootMotion.AdjustRootMotionToDistance(targetPosition - transform.position, trackIndex);`.
## BoneFollower
This component references a bone of a [SkeletonRenderer](/spine-unity-main-components#SkeletonRenderer-Component) component and sets its own transform to that of the bone on every `Update`.
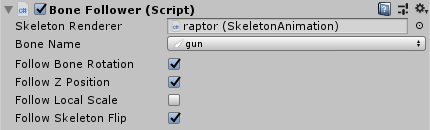
> **Note:** There is a [BoneFollowerGraphic](#BoneFollowerGraphic) component provided for [SkeletonGraphic](/spine-unity-main-components#SkeletonGraphic-Component) objects.
In contrast to the [SkeletonUtilityBone](#SkeletonUtilityBone) component a `BoneFollower` can be used as a single isolated GameObject without any parent bone objects.
Use this to let objects like particle systems follow a specific bone on the skeleton.
You can examine the example scene [Spine Examples/Getting Started/4 Object Oriented Sample](/spine-unity-examples#4-Object-Oriented-Sample) on how to set up a `BoneFollower` component.
## BoneFollowerGraphic
This component is a variant of the [Bone Follower](#BoneFollower) component to be used with [SkeletonGraphic](/spine-unity-main-components#SkeletonGraphic-Component) components.
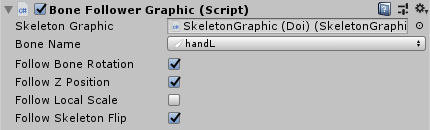
In contrast to the [SkeletonUtilityBone](#SkeletonUtilityBone) component a `BoneFollowerGraphic` can be used as a single isolated GameObject without any parent bone objects.
Use this to let objects like particle systems follow a specific bone on the skeleton.
You can examine the example scene [Spine Examples/Getting Started/6 Skeleton Graphic](/spine-unity-examples#6-SkeletonGraphic) on how to set up a `BoneFollowerGraphic` component.
## PointFollower
This component is similar to the [Bone Follower](#BoneFollower) component but follows a [PointAttachment](/spine-points) instead of a bone.
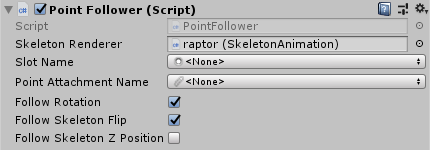
In contrast to the [SkeletonUtilityBone](#SkeletonUtilityBone) component a `PointFollower` can be used as a single isolated GameObject without any parent bone objects.
## BoundingBoxFollower
This component is used to match a [Bounding Box](/spine-bounding-boxes) at a skeleton's slot. It extracts the shape and assigns it at a `PolygonCollider2D` and enables or disables it every frame to match the current animation.
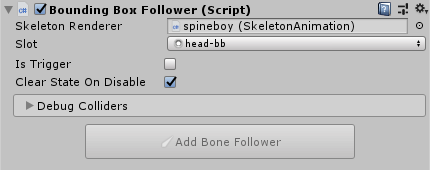
> Note: The bone's position is not automatically followed, which is why it is typically used together with a `BoneFollower` component. You can use the `Add Bone Follower` button in the `BoundingBoxFollower` inspector to create and setup a `BoneFollower` component.
> Note: Vertex deformation animation (moving vertices of a Bounding Box over time in an animation) is not followed along, it only covers the initial shape.
See [Bone Follower](#BoneFollower) for further information.
## SkeletonUtilityBone
Sometimes you may want to modify bone positions programmatically at runtime to react to physics or user input.
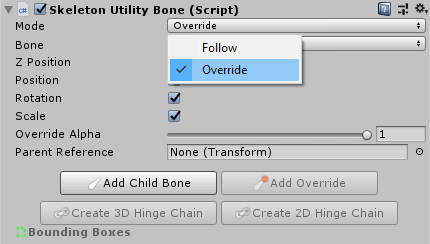
The [SkeletonUtilityBone](#SkeletonUtilityBone) component provides a convenient interface to let GameObjects follow a bone position, override a bone position manually or via 2D and 3D physics. It can be configured to either *follow* the local bone position or *override* it on every `Update`. When set to `Override`, the component will set the bone position before the [SkeletonAnimation](/spine-unity-main-components#SkeletonAnimation-Component) component updates the world transforms.
> **Important Note:** A `SkeletonUtilityBone` uses local transform values. It relies on a hierarchy of `SkeletonUtilityBone` GameObjects that mirrors the skeleton's bone hierarchy. The recommended way to quickly create a `SkeletonUtilityBone` hierarchy is via the [`SkeletonUtility`](#SkeletonUtility) component described [below](#SkeletonUtility).
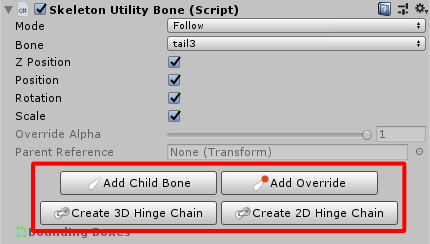
The `SkeletonUtilityBone` Inspector also provides an interface to create additional child bones (selectively or recursively) or create a [2D and 3D hinge chain](#Create-2D-and-3D-Hinge-Chains-for-Physics).
Once your hierarchy of `SkeletonUtilityBones` is created, the Hierarchy panel shows different icons next to a `SkeletonUtilityBone` GameObject depending on whether it is set to
* `Follow`:

* or `Override`:


#### Example Use Case
Use a `SkeletonUtilityBone` in `Override` mode for use cases such as letting the user drag a bone of the skeleton around.
In case you need a GameObject to follow only a single bone position, you can use the [BoneFollower](#BoneFollower) component instead to save resources.
#### Example Scene
You can find an example scene that demonstrates usage of `SkeletonUtilityBone` at `Spine Examples/Other Examples/SkeletonUtility Animated Physics`. It shows how some `SkeletonUtilityBones` nodes are configured to `Follow` bone positions to be the necessary hierarchial parents for the `Override` nodes.
### 2D and 3D Hinge Chains for Physics
You may want to add physics to the cape of your character, have it drag heavy objects around or swing a morning-star.
The spine-unity runtime allows you to generate a physics rig of [HingeJoint](https://docs.unity3d.com/Manual/class-HingeJoint.html) or [HingeJoint2D](https://docs.unity3d.com/Manual/class-HingeJoint2D.html) elements from an existing [SkeletonUtilityBone](/spine-unity#SkeletonUtilityBone) hierarchy (see [Creating a Hierarchy of SkeletonUtilityBones](#Creating-a-Hierarchy-of-SkeletonUtilityBones)).
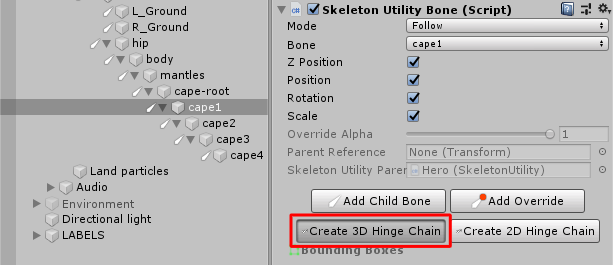
Select the first `SkeletonUtilityBone` chain element and in the Inspector choose `Create 3D Hinge Chain` or `Create 2D Hinge Chain` to generate the physics rig. The selected element and all its `SkeletonUtilityBone` children are turned into a hinge chain. You can then adjust the Rigidbody's drag and mass parameters to tweak the result. Raising the drag value will make the Rigidbody move slower and create the effect of being heavy or interact with air.
> Note that the chain root node is no longer parented to bones of the skeleton, but placed at the top hierarchy level of the scene. This is a requirement in Unity to have momentum applied properly. Do not reparent the chain root to bones of your skeleton, or chain elements will no longer be affected by skeleton movement!
#### 3D hinge chains
1. Create a [SkeletonUtilityBone hierarchy](/spine-unity#Creating-a-Hierarchy-of-SkeletonUtilityBones) as usual.
2. Select the first chain element in the Scene panel and in the Inspector choose `Create 3D Hinge Chain` to create the 3D hinge chain rig.
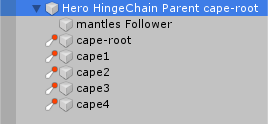
3. This will remove the chain GameObjects from the previous parent (`cape-root` in the example)
and place a new `HingeChain Parent` GameObject at the top level of the scene. As mentioned above, do not reparent this GameObject to the skeleton!
4. Adjust chain elements Rigidbody drag and mass parameters to tweak the result.
When the skeleton is flipped, the `HingeChain Parent` GameObject will automatically be rotated by 180 degrees to adjust the hinge chain to the flipped bone locations.
#### 2D hinge chains
1. Create a [SkeletonUtilityBone hierarchy](/spine-unity#Creating-a-Hierarchy-of-SkeletonUtilityBones) as usual.
2. Select the first chain element in the Scene panel and in the Inspector choose `Create 2D Hinge Chain` to create the 2D hinge chain rig.

3. This will remove the chain GameObjects from the previous parent (`cape-root` in the example)
and place a new `HingeChain Parent` GameObject at the top level of the scene. As mentioned above, do not reparent this GameObject to the skeleton!
4. Adjust chain elements Rigidbody2D drag and mass parameters to tweak the result.
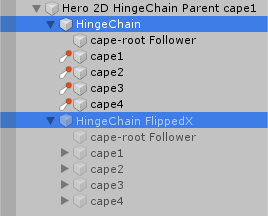
Note that this GameObject contains two child objects, named `Hinge Chain` and `Hinge Chain FlippedX`. When the skeleton is flipped, these GameObjects will automatically be activated and deactivated to enable the respective hinge chain.
## SkeletonUtility
#### Creating a Hierarchy of SkeletonUtilityBones
The `SkeletonUtility` component offers a quick way to create a hierarchy of `SkeletonUtilityBone` GameObjects mirroring the bone hierarchy of the skeleton.
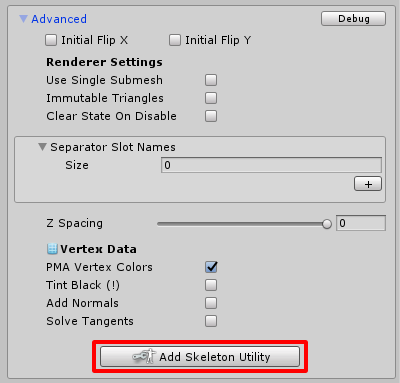
To create a `SkeletonUtility` component, select your [SkeletonRenderer](/spine-unity-main-components#SkeletonRenderer-Component) or [SkeletonGraphic](/spine-unity-main-components#SkeletonGraphic-Component) component and in the Inspector unfold the `Advanced` section and hit `Add Skeleton Utility`. Once created, the `Add Skeleton Utility` button will disappear and `SkeletonUtility` component is added to your GameObject.
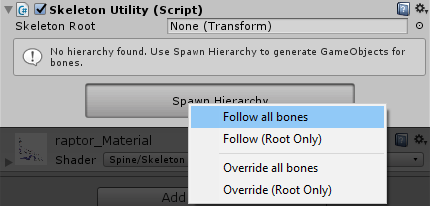
The `SkeletonUtility` component provides a `Spawn Hierarchy` button with the following options presented on click:
1. `Follow all bones` Creates `SkeletonUtilityBone` GameObjects for all bones in the hierarchy, set to mode `Follow`
2. `Follow (Root Only)` Creates only the root `SkeletonUtilityBone` GameObject, set to mode `Follow`
3. `Override all bones` Creates `SkeletonUtilityBone` GameObjects for all bones in the hierarchy, set to mode `Override`
4. `Override (Root Only)` Creates only the root `SkeletonUtilityBone` GameObject, set to mode `Override`
Each`SkeletonUtilityBone` can then be configured to override bone positions of a skeleton where necessary.

> **Note:** You can add additional `SkeletonUtilityBone` GameObjects via the inspector of a `SkeletonUtilityBone` later, the `Spawn Hierarchy` functionality serves as a rough starting point. You can also delete unneeded `SkeletonUtilityBone` GameObjects to save resources. Just remember you need to keep their parents intact, so do not delete GameObjects in the middle of a hierarchy-chain or change their parents.
## SkeletonUtilityConstraint

#### C# #
Base class to derive skeleton utility constraint subclasses from. It automatically registers itself at the parent `SkeletonUtility` and will be updated accordingly.
See example constraint classes `SkeletonUtilityGroundConstraint` and `SkeletonUtilityEyeConstraint` for how to write your own constraint classes.
#### Example Scene
The spine-unity runtime comes with example scenes that demonstrate the above constraints. You can find them in `Spine Examples/Other Examples/SkeletonUtility GroundConstraint` and `Spine Examples/Other Examples/SkeletonUtility Eyes`.
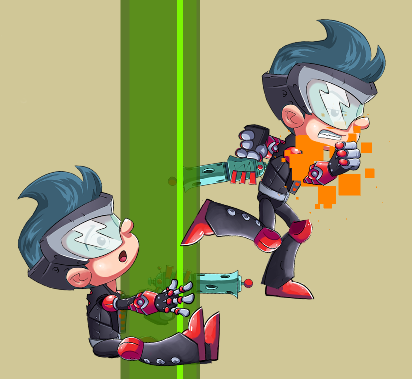
## SkeletonRendererCustomMaterials
You may want to override materials for a specific Skeleton instance or even only at certain slots. This component provides an inspector interface to assign custom material overrides for [SkeletonRenderer](/spine-unity-main-components#SkeletonRenderer-Component).
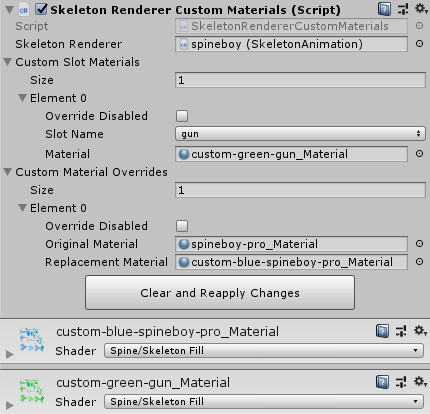
You can right-click on a [SkeletonRenderer](/spine-unity-main-components#SkeletonRenderer-Component) and select `Add Basic Serialized Custom Materials` to add this component to the renderer. Add entries to the `Custom Slot Materials` array to override materials at certain slots or to the `Custom Material Overrides` array to replace one material with another for the whole skeleton. Be sure to uncheck `Override Disabled` to enable the respective material overrides.
> **Note:** This component is not intended to be interfaced through code. To dynamically set materials for your SkeletonRenderer through code, you can directly access `SkeletonRenderer.CustomMaterialOverride` for material array overrides and `SkeletonRenderer.CustomSlotMaterials` for slot material overrides.
## SkeletonGraphicCustomMaterials
A variant of [SkeletonRendererCustomMaterials](#SkeletonRendererCustomMaterials) for [SkeletonGraphic](/spine-unity-main-components#SkeletonGraphic-Component). This component provides an inspector interface to assign custom material and texture overrides for [SkeletonGraphic](/spine-unity-main-components#SkeletonGraphic-Component).
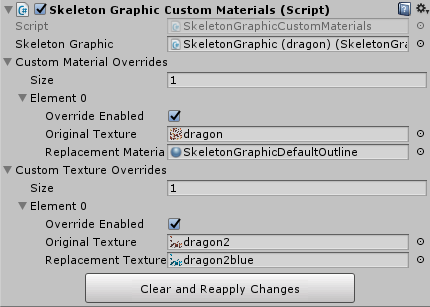
You can right-click on a [SkeletonGraphic](/spine-unity-main-components#SkeletonGraphic-Component) and select `Add Basic Serialized Custom Materials` to add this component to the GameObject. Add entries to the `Custom Texture Overrides` array to replace one texture with another for the whole skeleton. Add entries to the `Custom Material Overrides` array to replace the used material at an original texture (before replacement) with another material. Be sure to check `Override Enabled` to enable the respective texture or material overrides.
> **Note:** This component is not intended to be interfaced through code. To dynamically set materials for your SkeletonGraphic through code, you can directly access `SkeletonGraphic.CustomMaterialOverride` for material array overrides and `SkeletonGraphic.CustomTextureOverride` for texture overrides.
## SkeletonRenderSeparator
You may want to display other GameObjects between parts of your character, e.g. to let your character run into a tree and display one leg in front and one behind the trunk. The `SkeletonRenderSeparator` component allows you to split your [SkeletonRenderer](/spine-unity-main-components#SkeletonRenderer-Component) into two or more `SkeletonPartsRenderers` with customizable layer order.
> **Note:** The [SkeletonGraphic](/spine-unity-main-components#SkeletonGraphic-Component) component provides render separation functionality directly at the `SkeletonGraphic` Inspector in the `Advanced` section, it does not require any additional components.
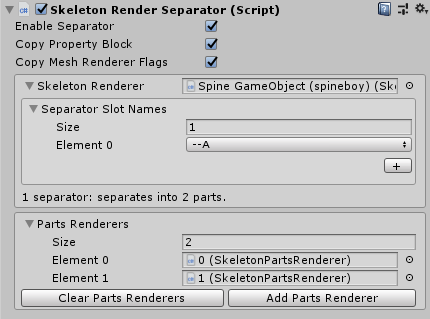
> **Note:** Normally, Spine renderer components will use a single renderer to display the whole mesh of a skeleton. This unfortunately prevents you from inserting other `UnityEngine.Renderers` (`SpriteRenderer`, `MeshRenderer`, `ParticleSystem`, etc.) between its parts.