<div style="padding:15px 15px 2px 20px; border-radius:2px; margin-bottom:20px; border:1px solid #ddd">

<callout>
<p style="margin-bottom:0.75em"><b>Licensing</b></p>!!
A Spine license is [required](/git/spine-runtimes/spine-unity#licensing) to integrate the Spine Runtimes into your applications.
</callout>

<div style="font-size: 1.6em; margin: 0 0 .5em;">spine-unity Runtime Documentation</div>!!
* [Installation](/spine-unity-installation)
* [Examples](/spine-unity-examples)
* [Assets](/spine-unity-assets)
* [Main Components](/spine-unity-main-components)
* [Utility Components](/spine-unity-utility-components)
* [Rendering](/spine-unity-rendering)
* [Timeline Extension UPM Package](/spine-unity-timeline)
* [On-Demand Loading Extension UPM Packages](/spine-unity-on-demand-loading)
* [FAQ](/spine-unity-faq)
</div>!!

# Assets

## Exporting Spine Assets for Unity
![](/img/spine-runtimes-guide/spine-unity/spine-unity-export-settings.png)

### Export User Guide
You can find complete instructions in the Spine User Guide on how to 

1. [Export skeleton & animation data](/spine-export)
2. [Export texture atlases containing the images of your skeleton](/spine-texture-packer)

### Spine Unity Export for Beginners
The following shows a simple way to export Spine assets for Unity. Once you are familiar with the basics you can choose optimized settings for improved results.
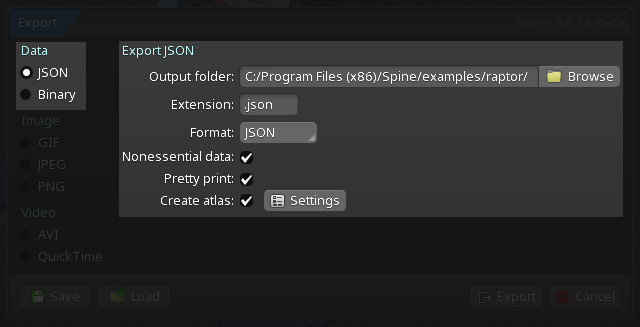
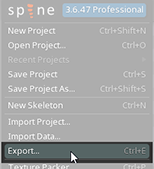
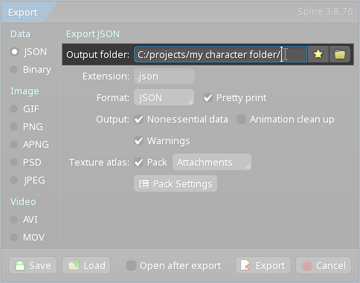
1. After you have created your skeleton and animations, click on `Spine Menu`>`Export...` (`CTRL`+`E`). This opens the **Export window**.  
	![](/img/spine-runtimes-guide/spine-unity/spinemenu-export-s.png)    
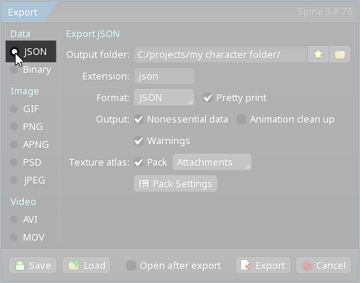
1. Choose `JSON` on the upper-left of the Export window.  
 	![](/img/spine-runtimes-guide/spine-unity/exportwindow-json-s.png)  
	> Note: For production you should later prefer  [binary skeleton](#Binary-Export-for-Unity) exports over JSON exports, as they are smaller in size and faster to load.
1. Check the `Texture Atlas` `Pack` checkbox. (Checking `Nonessential data`, `Pretty print` are also recommended for beginners). Be sure to have `Animation cleanup` disabled, otherwise keys identical to setup pose will not be exported.  
	![](/img/spine-runtimes-guide/spine-unity/exportwindow-createatlas-s.png)    
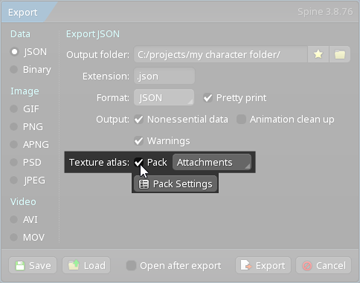
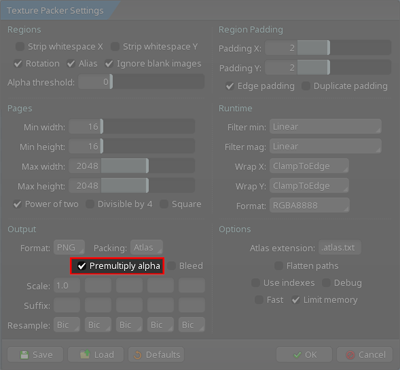
	1. Click on `Pack Settings` below the `Pack` checkbox. This opens the **Texture Packer Settings** window.
	1. On the lower-right, look for the textbox labeled `Atlas extension` and make sure it is set to `.atlas.txt`.
	![](/img/spine-runtimes-guide/spine-unity/texture-packer-atlas-txt-s.png)    
	
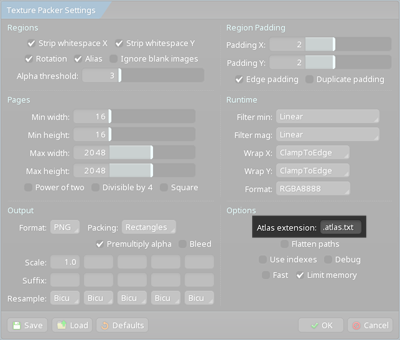
	1. > **For spine-unity 4.3 and newer:** Disable `Premultiply alpha` and enable `Bleed`.
	> ![](/img/spine-runtimes-guide/spine-unity/straight-alpha-export-s.png)    
	
	1. You're done with the Texture Packer Settings window. Click `OK` to close.
	
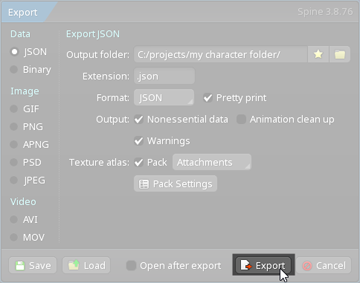
1. In the **Export window**, pick an output folder. (Recommendation: Create a new empty folder.)
	![](/img/spine-runtimes-guide/spine-unity/exportwindow-json-outputfolder-s.png)  
1. Click `Export`.
	![](/img/spine-runtimes-guide/spine-unity/exportwindow-exportbutton-s.png)
1. This will export three files:
	![](/img/spine-runtimes-guide/spine-unity/three-exported-files.png)
	1. `skeleton-name.json` or `skeleton-name.skel.bytes`, containing your skeleton and animation data.
	2. `skeleton-name.atlas.txt`, containing information about the texture atlas.
	3. One or more `.png` files, each representing on page of your texture atlas containing the packed images your skeleton uses.
1. You can now continue with section [Importing Spine Assets into Unity](#Importing-Spine-Assets-into-Unity).

### Binary Export for Unity

Exporting in binary format instead of JSON will result in smaller file size and faster loading.

The following shows how to change to binary export for spine-unity.
![](/img/spine-runtimes-guide/spine-unity/exportwindow-binary-s.png)
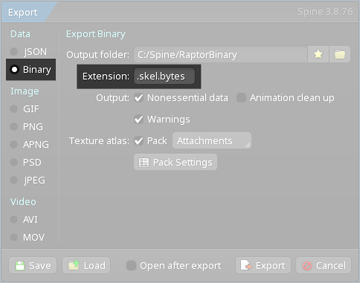
1. Choose `Binary` on the upper-left of the Export window instead of `JSON`.
1. Set the `Extension` to `.skel.bytes`.

> **Note:** spine-unity cannot load files with extension `.skel`. Be sure to use extension `.skel.bytes`.

### Advanced - Automating Exports

If you have many projects, it is recommended to automate the export of your skeleton and atlas assets using the Spine [command line interface](/spine-command-line-interface). This eliminates repetitive manual work and allows for easy re-export of all projects at once, should you decide to upgrade to a newer Spine version.  

You can explore examples of utilizing the command line interface [here](/spine-command-line-interface#Examples).  
For example, we use this script to export all the Spine example projects and to create texture atlases: [export.sh](https://github.com/EsotericSoftware/spine-runtimes/blob/4.2/examples/export/export.sh)

### Advanced - Single Texture Atlas Export and SkeletonGraphic

It is recommended in general to use a single-texture (single-page) atlas where possible to reduce the number of draw calls caused by additional submeshes. This is especially true for [SkeletonGraphic](/spine-unity-main-components#SkeletonGraphic-Component). Due to limitations of the used Unity `CanvasRenderer`, [SkeletonGraphic](/spine-unity-main-components#SkeletonGraphic-Component) is limited to a single texture by default. You can enable `Advanced - Multiple CanvasRenderers` at the `SkeletonGraphic` component Inspector to generate a child `CanvasRenderer` `GameObject` for every submesh to raise the texture limit. For performance reasons, this is best avoided where possible. This means Skeletons used in UI shall be packed as a single-texture (single-page) atlas, rather than multi-page atlases.

If they do not fit into a single atlas page, you can pack texture atlas pages [grouped by folder](/spine-texture-packer#Folder-structure). This way you can ensure that each skin requires only a single atlas page.

When the images are placed in the respective folders, you can export the skeleton with the following steps:
1. Press `Ctrl+E` or in the dropdown menu select `Export...` 
2. Enable `Texture Atlas` `Pack` and select `Image Folder` instead of `Attachments` right to it.
3. (optional) Check in `Pack Settings` if under `Options` in the bottom right `Flatten Paths` and `Combine Subdirectories` is disabled (this is the default). 
4. Click Export.

## Atlas Texture Workflows

### Linear vs Gamma Color Space in Unity

> **Important Note:** It is very important to decide on the [color space](https://docs.unity3d.com/6000.2/Documentation/Manual/differences-linear-gamma-color-space.html) to be used in your Unity project early on as it has a big impact on how any blending will look. This affects both alpha-blending or semi-transparent parts as well as additive/multiply/screen blending for special effects. Additionally, the used color space dictates how you can export your atlas texture assets from the Spine Editor.  

Unity uses Linear color space by default for new projects. However, many Spine users work with 2D assets that have been carefully layered and color-corrected in external editors like Photoshop, which default to Gamma-space blending. As a result, blended colors will appear duller and more desaturated in Unity compared to the original artwork, which can be frustrating.

![](/img/spine-runtimes-guide/spine-unity/comparison/spine-gamma-unity-linear-comparison.png)

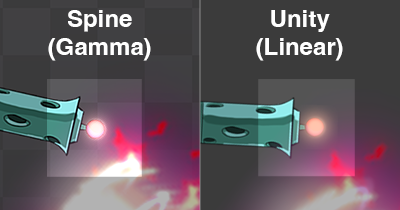
For this reason, we generally recommend switching the project to **Gamma color space** for more intuitive blending that better matches the original design.

That said, **Linear color space** is still appropriate—particularly if you're using Spine skeletons in realistic 3D environments with dynamic lighting.

#### Advantages of Gamma color space
- Blending behaves in a more intuitive way (image editors perform blending in Gamma space by default).
- Easier to author in any image editor in advance and preview the result.
- You can use PMA textures which provide better mip-mapping.
![Mipmap comparison between straight alpha and PMA workflows](/img/spine-runtimes-guide/spine-unity/comparison/pma-mipmap-comparison.gif)

#### Advantages of Linear color space
- 3D lighting: angle-dependent light falloff (for 2D skeletons done via normalmaps) is more physically correct.
![](/img/spine-runtimes-guide/spine-unity/comparison/lighting-comparison-linear.png)
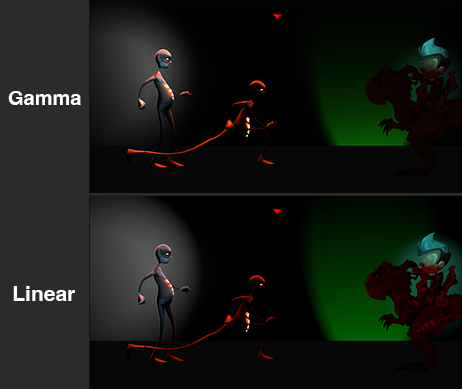
- When layering additive light layers, any light-pixels add up in a more physically realistic way. *(Note this may or may not be what you want)*
![](/img/spine-runtimes-guide/spine-unity/comparison/additive-blending-comparison-linear.gif)
- Post-processing effects work best in Linear color space.
![](/img/spine-runtimes-guide/spine-unity/comparison/post-processing-comparison-linear.gif)

You can switch your Unity project color space to Gamma via `Edit - Project Settings` (`Unity - Project Settings` on Mac) `Player - Other Settings - Color Space`.

#### Spine Editor Color Space 

The Spine Editor defaults to Gamma color space, but can be switched to Linear space in [Spine - Settings - Viewport](https://de.esotericsoftware.com/spine-settings#Color-management).  
Once you have decided on a project color space, it is highly recommended to also adjust the Spine Editor to match your Unity project for consistent results.

### Premultiplied vs Straight Alpha Export

Spine offers two basic workflows via Texture Packer Settings how atlas textures can be exported:
1. **Straight alpha** (required when using Linear color space)  
![](/img/spine-runtimes-guide/spine-unity/straight-alpha-export-s.png)
Texture Packer setting `Premultiply alpha` disabled, `Bleed` enabled.  
1. **Premultiplied alpha (PMA)** (default export mode in Spine Editor, premultiplied in Gamma color space)  
![](/img/spine-runtimes-guide/spine-unity/premultiplied-alpha-export-s.png)
Texture Packer setting `Premultiply alpha` enabled.  

**Choosing the right workflow:**
- **If you're uncertain about color space** or might switch between Linear and Gamma in the future: Use **straight alpha** workflow as it is compatible with both color spaces.
- **If you're certain you'll use Gamma color space exclusively:** Use **premultiplied alpha (PMA)** workflow as it provides superior mipmap quality with crisper details in semi-transparent areas.

Unity now uses Linear color space for new projects by default, and premultiplied alpha textures are incompatible with Linear color space (causing incorrect borders when converted from Gamma to Linear space). See section [Linear vs Gamma Color Space in Unity](#Linear-vs-Gamma-Color-Space-in-Unity) for details.

It is very important to match export and import settings correctly, see section [Premultiplied vs Straight Alpha Import](#Premultiplied-vs-Straight-Alpha-Import) for correct settings in Unity.

## Importing Spine Assets into Unity

1. Open your Unity project in the Unity Editor. It should already have a functioning spine-unity runtime in it, as described in section [Installation](/spine-unity-installation).
2. Open the folder of the exported files. (`.json`, `.atlas.txt` and `.png`)
3. Copy the exported files (or the folder containing them) to your desired subfolder of your project's `Assets` folder. You can do this by dragging the exported files from an Explorer/Finder window into your desired folder in Unity's Project panel.
![](/img/spine-runtimes-guide/spine-unity/explorer-to-unity-project.gif)

The spine-unity runtime will automatically generate the necessary additional Unity assets upon detecting the added files.

The following assets are generated:
![](/img/spine-runtimes-guide/spine-unity/import-three-generated-assets.png)
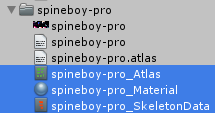
1. an **_Atlas** asset for the texture atlas file (`.atlas.txt`). It holds a reference to the material and the `.atlas.txt` file.
2. a **_Material** asset for each texture atlas page (`.png`). It holds references to the shader and the `.png` texture.
3. a **_SkeletonData** asset for skeleton data files (`.json`, `.skel.bytes`). It holds a reference to the `.json` or `.skel.bytes` file and the generated **_Atlas** asset. It additionally provides custom import and animation settings for your skeleton, see section [Skeleton Data Asset](#Skeleton-Data-Asset).

### Premultiplied vs Straight Alpha Import

As described in [Premultiplied vs Straight Alpha Export](#Premultiplied-vs-Straight-Alpha-Export),
Spine offers two basic workflows of how atlas textures can be exported:
1. **Straight alpha** (required with Linear color space)
1. **Premultiplied alpha (PMA)** (default export mode in Spine Editor, premultiplied in Gamma color space)

#### Preferences Auto-Import settings for correct import

**Important Note:** It is very important that the texture import and material settings match the atlas texture export settings. The spine-unity runtime provides a [Spine Preferences section](#Spine-Preferences) in Unity's `Preferences` window, accessible via `Edit - Preferences` (`Unity - Preferences` on Mac) which provides **Auto-Import settings** to ensure proper setup.  

![Spine Preferences - straight alpha presets](/img/spine-runtimes-guide/spine-unity/spine-preferences-straight-presets.png)

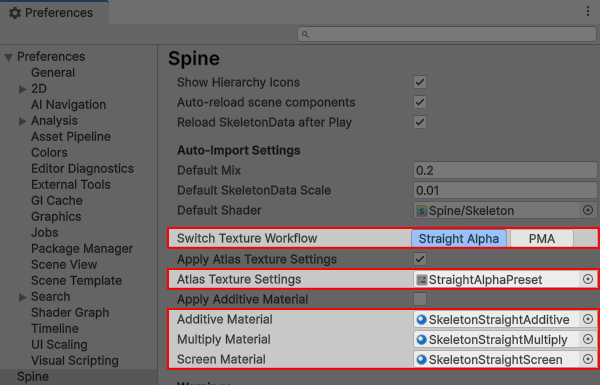
1. Since version 4.3 the Preferences sections provides `Switch Texture Workflow` buttons for quickly switching to `Straight Alpha` or `PMA`, saving you any manual adjustments of (2) and (3) below.
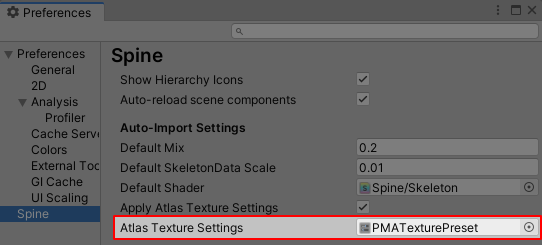
2. The *Atlas Texture Settings* parameter is used to automatically apply the proper texture import settings at newly imported atlas textures. When switching from straight alpha workflow to PMA or vice versa, this preset needs to be adjusted.
	![Spine Preferences - Atlas Texture Settings](/img/spine-runtimes-guide/spine-unity/spine-preferences-pma-preset.png)
	![Spine Preferences PMA Preset Selection](/img/spine-runtimes-guide/spine-unity/pma-preset-selection.png)
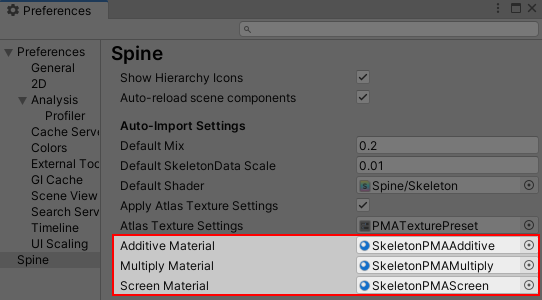
3. `Additive Material`, `Multiply Material` and `Screen Material` define the template materials for each blend mode. When switching from straight alpha workflow to PMA or vice versa, these need to be adjusted accordingly as well.
	![Spine Preferences - Blend Mode Materials](/img/spine-runtimes-guide/spine-unity/spine-preferences-blendmode-materials.png)
	![Spine Preferences Blend Mode Material Selection](/img/spine-runtimes-guide/spine-unity/blendmode-material-selection.png)

For **straight alpha workflow** *(already the default in spine-unity 4.3 and newer)*:
- a) use the `Switch Texture Workflow` - `Straight Alpha` button to switch presets at once.
	![Spine Preferences - straight alpha presets](/img/spine-runtimes-guide/spine-unity/spine-preferences-straight-presets.png)
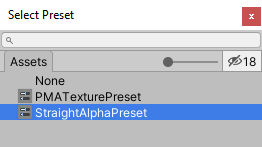
- b) or manually set `Atlas Texture Settings` to `StraightAlphaTexturePreset`, and set blend mode materials to `SkeletonStraightAdditive`, `SkeletonStraightMultiply` and `SkeletonStraightScreen`.

For **premultiplied alpha (PMA) workflow** (only works with Gamma color space):
- a) use the `Switch Texture Workflow` - `PMA` button to switch presets at once.
	![Spine Preferences - PMA presets](/img/spine-runtimes-guide/spine-unity/spine-preferences-pma-presets.png)
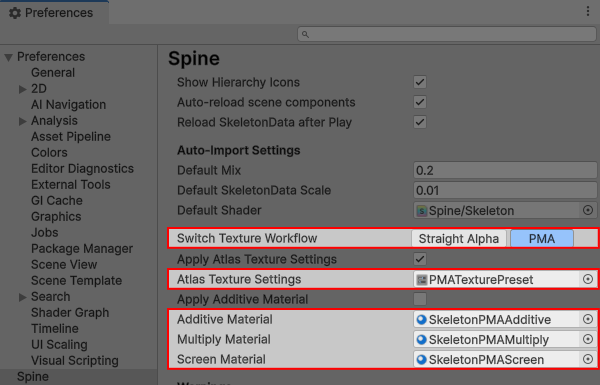
- b) or manually set `Atlas Texture Settings` to `PMATexturePreset`, and set blend mode materials to `SkeletonPMAAdditive`, `SkeletonPMAMultiply` and `SkeletonPMAScreen`. This was the default in spine-unity 4.2 and earlier.

You can also create your own `TextureImporter` `Preset` asset and blend mode material templates and assign them here. When creating your own, it is recommended to choose a name with `PMA` or `Straight` in it to reflect the used blend mode.

Whenever you see dark borders around transparent areas, or colorful stripes around your attachment images, it is very likely because of incorrect import settings.

<h4 style="font-size: 1.429em; line-height: 1.4em; margin-bottom: .4em">Correct Texture Packer export and Texture and Material import settings: <span id="Correct-Texture-Packer-export"></span></h4>!!

1. Straight Alpha
	![](/img/spine-runtimes-guide/spine-unity/straight-alpha-export-import.png)
	Texture Packer setting `Premultiply alpha` disabled, `Bleed` enabled,  
	Unity Texture settings `sRGB (Color Texture)` and `Alpha Is Transparency` enabled,  
	Unity Material parameter `Straight Alpha Texture` enabled.  

	> If you are new to Spine export settings, be sure to check out [Atlas Texture Workflows](#Atlas-Texture-Workflows) and [Spine Unity Export for Beginners](#Spine-Unity-Export-for-Beginners) first.

1. Premultiplied Alpha
	![](/img/spine-runtimes-guide/spine-unity/premultiplied-alpha-export-import.png)
	Texture Packer setting `Premultiply alpha` enabled,  
	Unity Texture settings `sRGB (Color Texture)` and `Alpha Is Transparency` disabled,  
	Unity Material parameter `Straight Alpha Texture` disabled.

	> **Note:** For PMA textures, `sRGB (Color Texture)` was previously recommended to be enabled, however when `Generate Mip Maps` is enabled, this combination may lead to white seams. To avoid these artifacts and because it has no drawbacks in Gamma space, it is now recommended to keep `sRGB (Color Texture)` disabled with PMA textures.

**Default settings:**
- **Spine Editor:** Texture packer settings default to premultiplied alpha (`Premultiply alpha` enabled).
- **spine-unity 4.3 and later:** Import settings default to straight alpha workflow.
- **spine-unity 4.2 and earlier:** Import settings default to premultiplied alpha workflow.

The Spine shaders that come with the spine-unity runtime support both workflows. When using straight alpha textures, enable the `Straight Alpha Texture` parameter on materials. When using premultiplied alpha textures, ensure this parameter is disabled.

Be sure to configure all textures and materials accordingly as described above when changing the used atlas texture workflow between straight alpha and PMA. You can check or modify the current color space via `Project Settings - Player - Other Settings - Color Space`.

### Import Troubleshooting

When something goes wrong importing your skeleton into Unity there are a number of possible causes, from incorrect Spine export settings to incorrect settings in Unity. This video will help you better understand the correct settings for many common problems during import.

<iframe width="560" height="315" src="https://www.youtube.com/embed/AoTRahDLKjs" title="YouTube video player" frameborder="0" allow="accelerometer; autoplay; clipboard-write; encrypted-media; gyroscope; picture-in-picture" allowfullscreen></iframe>!!

### Advanced - Unity SpriteAtlas as Atlas Provider

> **Note:** It is encouraged to follow the normal Spine workflow and use sprite atlases created by Spine instead of Unity `Sprite Atlas` assets. Spine atlases provide superior packing, support multiple atlas pages and are less prone to problems. Use Unity's `Sprite Atlas` assets as an atlas provider only when you cannot use the normal Spine workflow. Also consider that you can [re-pack](/spine-unity-main-components#Combining-Skins) used texture regions of a collected skin to a single atlas texture at runtime.

You can use Unity's [`SpriteAtlas`](https://docs.unity3d.com/Manual/class-SpriteAtlas.html) as atlas provider as an alternative to `.atlas.txt` and `.png` files alongside a skeleton data file. Import is handled via a special `Spine SpriteAtlas Import` tool window accessible via `Window - Spine - SpriteAtlas Import`.

![Spine SpriteAtlas Import Window](/img/spine-runtimes-guide/spine-unity/spriteatlas/spine-spriteatlas-import-window.png)

Steps to prepare the `Sprite Atlas`:
1. Create a `Sprite Atlas` via `Assets - Create - Sprite Atlas`.
2. Add the folder containing the Sprites to be used as attachments to `Objects for Packing` in the [`Sprite Atlas` Inspector](https://docs.unity3d.com/Manual/class-SpriteAtlas.html).
3. (a) For Unity versions prior to 2018.2, please manually disable `Tight Packing` and enable `Read/Write Enabled`.  
	(b) in Unity versions 2018.2 an newer, these settings are automatically adjusted for you.
![Spine SpriteAtlas Import Window](/img/spine-runtimes-guide/spine-unity/spriteatlas/spriteatlas-inspector.png)
4. Assign the `Sprite Atlas` to the `Sprite Atlas` property in the new `Spine SpriteAtlas Import` window. Additional assets are generated automatically.
![Spine SpriteAtlas Import Window](/img/spine-runtimes-guide/spine-unity/spriteatlas/spine-spriteatlas-import-window-top.png)
5. Hit `Load regions by entering Play mode` to briefly switch into play mode and back again to load the region information. Your `Sprite Atlas` is now ready for use as a Spine atlas.

To use the atlas at a `.json` or `.skel.bytes` skeleton asset:
1. Place the `.json` or `.skel.bytes` file in the same directory as the newly created atlas assets.
2. Assign it to the `Skeleton json/skel file` property in the `Spine SpriteAtlas Import` window.
![Spine SpriteAtlas Import Window](/img/spine-runtimes-guide/spine-unity/spriteatlas/spine-spriteatlas-import-window-bottom.png)
3. Hit `Import Skeleton` to generate the `_SkeletonData` file using the `Sprite Atlas` assets.

## Spine Preferences

The spine-unity runtime provides a `Spine` section in Unity's `Preferences` window, accessible via `Edit - Preferences` (`Unity - Preferences` on Mac).
Here you can setup default values used upon skeleton import and instantiation, as well as customize appearance and update behavior of the spine-unity runtime.

![Spine Preferences Window](/img/spine-runtimes-guide/spine-unity/spine-preferences-window.png)

* *Show Hierarchy Icons*. Show relevant icons next to `GameObjects` in the Hierarchy panel with Spine components on them.
* *Auto-reload scene components*. Reloads skeleton components in the scene whenever their SkeletonDataAsset is modified. This may be slow when your scenes have large numbers of [SkeletonRenderer](/spine-unity-main-components#SkeletonRenderer-Component) or [SkeletonGraphic](/spine-unity-main-components#SkeletonGraphic-Component) components.
* *Reload SkeletonData after Play*. When enabled, the shared SkeletonData of all skeletons in the active scene is reloaded (from the .json or .skel.bytes file) after exiting play-mode. This may add undesired delays, but prevents (accidental) modifications to the shared SkeletonData during play-mode carrying over its effect into subsequent plays.
* *Auto-Import Settings*
	* *Default Mix*. The [Default Mix Duration](#Mix-Settings) for newly imported SkeletonDataAssets.
	* *Default SkeletonData Scale*. The default `Scale` value for newly imported SkeletonDataAssets.
	* *Default Shader*. The default shader assigned at materials created for newly imported skeleton atlas textures.
	* *Switch Texture Workflow (4.3 and newer)*. Allows for quickly switching presets to `Straight Alpha` or `PMA` workflow, saving manual adjustments of `Atlas Texture Settings` and `Additive/Multiply/Screen Material` below.
	* *Apply Atlas Texture Settings*. Apply reference `Atlas Texture Settings` at texture importers specified below.
	* *Atlas Texture Settings*. The texture import settings to be applied at newly imported atlas textures. For straight alpha texture workflow *(recommended)* use `StraightAlphaTexturePreset` here (ensure `Premultiply alpha` is disabled in Spine's Texture Packer Settings). This preset is already assigned by default in spine-unity 4.3 and newer. When using premultiplied alpha (PMA) textures (the Spine Editor export default), use `PMATexturePreset`. You can also create your own `TextureImporter` `Preset` asset and assign it here.
	* *Apply Additive Material*. The default [Apply Additive Material](#Skeleton-Data) value for newly imported SkeletonDataAssets. See [`SkeletonData`](#Skeleton-Data) Blend Mode Materials.
	* *Additive Material*. Material template for slot blend mode `Additive`. See [`SkeletonData`](#Skeleton-Data) Blend Mode Materials.  
	Make sure to chose the straight alpha vs PMA material variant matching your workflow above.
	* *Multiply Material*. Material template for slot blend mode `Multiply`. See [`SkeletonData`](#Skeleton-Data) Blend Mode Materials.  
	Make sure to chose the straight alpha vs PMA material variant matching your workflow above.
	* *Screen Material*. Material template for slot blend mode `Screen`. See [`SkeletonData`](#Skeleton-Data) Blend Mode Materials.  
	Make sure to chose the straight alpha vs PMA material variant matching your workflow above.
* *Warnings*
	* *Atlas Extension Warning*. Log a warning and recommendation whenever a `.atlas` file is found.
	* *Texture Settings Warning*. Log a warning and recommendation whenever texture import settings are detected that could lead to undesired effects, e.g. white border artifacts.
	* *Component & Material Warning*. Log a warning and recommendation whenever Component and Material settings are not compatible.
	* *SkeletonDataAsset no file Error*. Log an error when querying `SkeletonData` from `SkeletonDataAsset` with no json or binary file assigned.
	* *Workflow Mismatch Dialog*. Show warning dialog when PMA atlas is detected but not supported with current project settings.
* *Editor Instantiation*
	* *Default Slot Z-Spacing*. The default [Z Spacing](/spine-unity-main-components#Setting-Advanced-Parameters) parameter of newly instantiated [SkeletonRenderer](/spine-unity-main-components#SkeletonRenderer-Component) or [SkeletonGraphic](/spine-unity-main-components#SkeletonGraphic-Component) components.
	* *Default Loop*. The default `Loop` parameter of newly instantiated [SkeletonRenderer](/spine-unity-main-components#SkeletonRenderer-Component) or [SkeletonGraphic](/spine-unity-main-components#SkeletonGraphic-Component) components.
	* *Physics Inheritance*
		* *Default Position*. The Default [Physics Inheritance - Position](/spine-unity-main-components#Setting-Advanced-Parameters) scale factor parameter of newly instantiated [SkeletonRenderer](/spine-unity-main-components#SkeletonRenderer-Component) or [SkeletonGraphic](/spine-unity-main-components#SkeletonGraphic-Component) components.
		* *Default Rotation*. The Default [Physics Inheritance - Rotation](/spine-unity-main-components#Setting-Advanced-Parameters) scale factor parameter of newly instantiated [SkeletonRenderer](/spine-unity-main-components#SkeletonRenderer-Component) or [SkeletonGraphic](/spine-unity-main-components#SkeletonGraphic-Component) components.
* *Mecanim Bake Settings*
	* *Include Folder Name in Event*. When enabled, Mecanim events will call methods named `"FolderNameEventName"`, when disabled it will call `"EventName"`.
* *Handles and Gizmos*
	* *Editor Bone Scale*. Size of bones and similar gizmo elements displayed in the Scene view.
* *Prefabs*
	* *Fix Prefab Overr. MeshFilter*. Global setting for the equally named skeleton component Inspector parameter, section [Advanced](/spine-unity-main-components#Setting-Advanced-Parameters). When the component parameter is set to `Use Global Setting`, this setting is used.
	* *Optimize Preview Meshes*. When enabled, Spine prefab preview meshes will be removed in a pre-build step to reduce build size. This increases build time as all prefabs in the project will be processed.
* *Unsafe Build Defines*
	* *Direct Data Access*. Allow unsafe direct data access. Currently affects reading `.skel.bytes` files, reading with fewer allocations.
* *Automatic Component Upgrade*
	* *Split Component Upgrade*. Allow automatic upgrade of skeleton components to split components new in version 4.3. Disable once all scenes and prefabs are migrated to avoid unnecessary editor checks.
	* *Upgrade Scenes & Prefabs*. *Upgrade All:* Opens and upgrades all scenes and prefabs in the project to split animation components new in version 4.3. Make sure to backup your project beforehand.
* *Threading Defaults*
	* *Threaded Mesh Generation.* Global setting for the equally named `SkeletonRenderer` and `SkeletonGraphic` Inspector parameter. When the component parameter is set to `Use Global Setting`, this setting is used.
	* *Threaded Animation.* Global setting for the equally named `SkeletonAnimation` and `SkeletonMecanim` Inspector parameter. When the component parameter is set to `Use Global Setting`, this setting is used.
	* *Load Balancing.* Enable load balancing to better utilize threads by redistributing workload at runtime. Only has an effect when using threaded animation or threaded mesh generation. Enabled by default.
	* *Thread Profiling.* Enable profiling of Spine worker threads in the Unity Profiler. Enable only when needed, as it adds some overhead.

* *Timeline Extension* - relevant for the [Timeline Extension UPM Package](/spine-unity-timeline)
	* *Default Mix Duration*. The default value for the [`Default Mix Duration`](/spine-unity-timeline#SkeletonAnimation-Track-and-SkeletonGraphic-Track) parameter of newly created `Spine Animation State Clips`.
	* *Use Blend Duration*. The default value for the [`Use Blend Duration`](/spine-unity-timeline#SkeletonAnimation-Track-and-SkeletonGraphic-Track) parameter of newly created `Spine Animation State Clips`.

## Updating Spine Assets
During development, you may frequently update your Spine skeleton data and texture atlas files. You can simply overwrite these files (`.json`, `.skel.bytes`, `.atlas.txt`, `.png`). Re-export the assets from the Spine Editor and copy the exported files to your subfolder of your project's `Assets` folder again, overwriting the existing files.

Unity will detect changes to these files and automatically re-import the modified assets. After re-import, all references to previously imported Spine assets will be intact and use the latest data.

> **Note:** Unity sometimes fails to recognize file changes. In this case, locate the folder containing the Spine assets in Unity's Project panel that you want to re-import, right-click on the folder, then select `Reimport` from the context menu.

## Skeleton Data Asset
The skeleton data asset (named with suffix `_SkeletonData`) stores information about the bone hierarchy, slots, draw order, animations and other data that constitutes your skeleton. Other components provided by the spine-unity runtime reference and share this skeleton data asset to animate and display a skeleton.

To inspect or modify a skeleton data asset, select it in Unity's Project panel. The Inspector panel will display all properties of the skeleton data for review and modification.

![](/img/spine-runtimes-guide/spine-unity/skeleton-data-settings.png)

### Skeleton Data

The SkeletonData section provides general import settings of the skeleton.

![](/img/spine-runtimes-guide/spine-unity/skeleton-data-skeleton-data.png)

* *Scale*. Allows you to specify a custom import scale value, affecting all skeleton instances referencing this data asset. Changing the value will immediately affect all instances of this skeleton.
	> **Note:** When you want to precisely match e.g. 32px of artwork to 1 game unit (and the attachment images have not been scaled in Spine), you can set this `Scale` parameter to `1/px_per_unit`. So for `32px/unit` you would set `Scale` to `1/32 = 0.03125`.

* *SkeletonData Modifiers*. Provide a way for users to add additional processing to skeleton data assets after loading from a `.json` or `.skel.bytes` file has been completed.
Please consult section [SkeletonData Modifier Assets](#SkeletonData-Modifier-Assets) below for additional information.

* *Blend Modes - Upgrade*. Upgrades an obsolete `BlendModeMaterialAsset` to the native Blend Mode Materials properties shown below.

* *Blend Mode Materials*. Skeleton slots with special blend modes require additional materials. These materials are setup automatically upon import, unless a `BlendModeMaterialAsset` is in use with older Unity and spine-unity versions. It is recommended to upgrade an assigned `BlendModeMaterialAsset` via the `Blend Modes - Upgrade` button above, as it prevents problems with newer Unity versions. You can customize material templates for each blend mode in the [Spine Preferences](#Spine-Preferences).
	* *Apply Additive Material*. When enabled, slots with `Additive` blend mode will also have materials generated for them. You can keep this parameter disabled when having [`Advanced - PMA Vertex Colors`](/spine-unity-main-components#Setting-Advanced-Parameters) enabled at your skeleton components (the default) as `Normal` and `Additive` slots can be drawn with the same PMA material.
	* *Additive Materials*, *Multiply Materials*, *Screen Materials*. These lists show the currently used blend mode materials for each blend mode.

### Atlas

Atlas references are used by the skeleton to resolve the exported image name references to the respective image areas for rendering.

![](/img/spine-runtimes-guide/spine-unity/skeleton-data-atlas.png)

Upon import the `Atlas Assets` array is automatically populated with one entry per atlas asset (ending with **_Atlas**).

In case spine-unity failed to automatically assign all required atlas assets, you can change the `Atlas Assets` `Size` to the desired amount of atlas assets and manually assign the required atlas assets to `Element0` - `ElementN`.

### Mix Settings

The skeleton data asset allows you to specify [animation mix times](/spine-applying-animations#Mix-times).

![](/img/spine-runtimes-guide/spine-unity/mix-settings-custom-duration.gif)

`Default Mix Duration` allows you to enter the default mix time, in seconds.

You can define mix times for two specific animations by clicking the `Add Custom Mix` button in the `Custom Mix Durations` section of the asset and setting specific mix durations, overriding the default mix duration value above.

Components using the skeleton data asset, like the skeleton animation component, use these mix times when playing back animations.

### Preview

The Preview section for a skeleton data asset allows you to inspect all bones, slots, animations, skins, and events contained in the asset.

![](/img/spine-runtimes-guide/spine-unity/skeleton-data-previewfull.png)

You can playback animations via the play buttons to the left of each animation and view a live update of the respective slots via `Show Attachments` in the `Slots` section. The timeline bar shows all events as purple markers. Hover over the markers while playing to display the event name.

![](/img/spine-runtimes-guide/spine-unity/inspector-preview-small.gif)

### Animation Reference Assets

![](/img/spine-runtimes-guide/spine-unity/skeleton-data-create-animation-ref.png)

Use the `Create Animation Reference Assets` button to generate reference assets for all animations of the skeleton. An `AnimationReferenceAsset` acts as a Unity asset referencing a single `Spine.Animation` and can be assigned to component properties in the Inspector.

![](/img/spine-runtimes-guide/spine-unity/animation-reference-assets-individual.png)

![](/img/spine-runtimes-guide/spine-unity/animation-reference-asset-usage.gif)

> **Note:** With spine-unity 4.3 and newer, AnimationReferenceAssets are created as sub-assets nested under a single `_AnimationReferences.asset` container to avoid hundreds of asset files and making project search faster.
>
> ![](/img/spine-runtimes-guide/spine-unity/animation-reference-assets-nested.png)
>
> If you need individual `AnimationReferenceAsset` files in a *ReferenceAssets* folder as on older runtime versions, add `SPINE_INDIVIDUAL_ANIMATION_REFERENCE_ASSETS` to your project's Scripting Define Symbols.

### Skeleton Mecanim

In case you want to use Unity's Mecanim animation system instead of Spine's default animation system, you can generate and assign a Mecanim controller via `Generate Mecanim Controller`.

![](/img/spine-runtimes-guide/spine-unity/skeleton-data-mecanim.png)

### Skeleton Baking

> **Note:** Baking is a specialized tool and is **not the recommended way** of using Skeletons in spine-unity! It is not used for [SkeletonMecanim](/spine-unity-main-components#SkeletonMecanim-Component), [SkeletonAnimation](/spine-unity-main-components#SkeletonAnimation-Component) or [SkeletonGraphic (UI)](/spine-unity-main-components#SkeletonGraphic-Component) components! It will instead bake a Skeleton down to a less flexible Prefab with a fixed hierarchy of `Transforms` with `MeshRenderers` and compatible animation clips.
> A lot of Spine's features don't exist in Unity's Animation system so they can't be translated and are ignored in the process.

![](/img/spine-runtimes-guide/spine-unity/skeleton-baking-window.png)

To open the `Skeleton Baking Window`, click on the gear icon at the top right of the `SkeletonDataAsset` Inspector and choose `Skeleton Baking`.

A detailled list of supported and unsupported features can be found [here in SkeletonBaker.cs](https://github.com/EsotericSoftware/spine-runtimes/blob/4.2/spine-unity/Assets/Spine/Editor/spine-unity/Editor/Windows/SkeletonBaker.cs#L44-L67).

> Note: Baking is not using the recently added Unity 2D animation system but the previously existing 3D `MeshRenderer` based system.

## Texture Atlas Asset
The texture atlas asset contains information about the images used by your skeleton, namely on what texture atlas page an image is stored, as well as its UV texture coordinates on the texture atlas page.

![](/img/spine-runtimes-guide/spine-unity/atlas-inspector.png)

You can view the material of the texture atlas pages by double clicking the material asset in the `Materials` array.

> **Note:** You can modify the materials and textures referenced by the texture atlas asset. When modifying textures, make sure the UV texture coordinates stay valid. The `SkeletonRenderer` components use a normal `MeshRenderer` for rendering, so materials and textures are applied normally just like they would when assigned at e.g. a cube or quad. So you can replace or pre-process the textures at the materials of your Texture Atlas Asset as needed.

The `Set Mipmap Bias to -0.5` button is intended for advanced users and can be used to compensate for blurry appearance when `Generate Mip Maps` is enabled on an atlas texture.

You can generate sprites for each image element of an atlas by pressing the `Apply Regions as Texture Sprite Slices` button. The generated sprites reference areas of the texture atlas image (`png` file) and can be used as any Unity sprite asset.

## SkeletonData Modifier Assets

SkeletonData modifier assets provide a way for users to add additional processing to skeleton data assets after loading from a `.json` or `.skel.bytes` file has been completed.

SkeletonDataAsset's Inspector provides a `Skeleton Data Modifiers` list you can add assets to.

![](/img/spine-runtimes-guide/spine-unity/skeletondatamodifierasset-inspector-field.png)

### Writing a custom SkeletonDataModifierAsset class
You can write your own custom `SkeletonDataModifierAsset` class to add additional processing to skeleton data assets after loading from a `.json` or `.skel.bytes` file. `SkeletonDataModifierAsset` is an abstract `ScriptableObject` class where you can derive your own classes from.

1. Create a new class derived from `SkeletonDataModifierAsset` and implement the `void Apply (SkeletonData skeletonData)` method. Add the `CreateAssetMenu` class attribute to list an entry for your class in the `Asset -> Create` menu.
```csharp
[[CreateAssetMenu(menuName = "TopMenu/Submenu/SubSubmenu", order = 200)]
public class BlendModeMaterialsAsset : SkeletonDataModifierAsset {
	
	public override void Apply (SkeletonData skeletonData) {
		...
	}
}
```
2. Create an instance of your new class by selecting your desired folder in the Project panel and selecting your newly created `Asset -> Create` menu entry. Assign the created asset at an element of the `Skeleton Data Modifiers` list of your SkeletonData asset.

`Apply(skeletonData)` will be called after loading data from the `.json` or `.skel.bytes` file has been completed.

<h4 style="font-size: 1.429em; line-height: 1.4em; margin-bottom: .4em">BlendModeMaterialsAsset Modifier Asset <i>(obsolete)</i></h4>!!

> **Note:** spine-unity now provides **native support for slot blend modes** `Additive`, `Multiply` and `Screen` at each `SkeletonDataAsset`, with automatic setup at newly imported skeleton assets. `BlendModeMaterialAssets` are now obsolete and replaced by the native properties at `SkeletonDataAsset`. The `SkeletonDataAsset` Inspector provides a new `Blend Modes - Upgrade` button to upgrade an obsolete `BlendModeMaterialAsset` to the native blend modes properties. This upgrade will be performed automatically on imported and re-imported assets in Unity 2020.1 and newer to prevent reported `BlendModeMaterialAsset` issues in these Unity versions. spine-unity 4.0 and newer will automatically perform this upgrade regardless of the Unity version.

`BlendModeMaterialsAsset` is a SkeletonData modifier asset class included in spine-unity. It holds references to materials that can be used to render attachments within slots that have the `Additive`, `Multiply` and `Screen` blend modes assigned to them in the Spine editor.

The Material references stored in BlendModeMaterials assets are used as templates to generate new Materials that use the appropriate texture needed by the loaded attachments.

The spine-unity runtime comes packaged with a ready-to-use `BlendModeMaterialsAsset` named `Default BlendModeMaterials`. Using this included asset allows the attachments in slots with special blend modes to use the included default `Multiply` and `Screen` shaders: `Spine/Blend Modes/Skeleton PMA Multiply` and `Spine/Blend Modes/Skeleton PMA Screen`.

If you need to use different Materials or shaders or Materials with different settings, you can create new `BlendModeMaterialsAsset`s using `Create -> Spine -> SkeletonData Modifiers -> Blend Mode Materials`. Then assign your Material templates to the created asset.

[Next: Main Components](/spine-unity-main-components)
[Previous: Examples](/spine-unity-examples)