!!
# Spine Web Player
The Spine web player lets you easily embed your Spine animations on your website.
!!
The player has controls that allow a user to:
* Pause/resume the currently playing animation.
* Scrub the timeline.
* Change the playback speed.
* Select an animation from a list of available animations.
* Select a skin from a list of available skins.
* Hide/show debug renderings of regions, meshes, bones, etc.
* Drag skeleton bones.
The player's controls can be disabled so it can be used just for displaying animations, without user input ([example](/blog/Spine-4.0-is-here)).
> **Note**: The Spine Web Player uses [WebGL](https://developer.mozilla.org/en-US/docs/Web/API/WebGL_API) for rendering. While WebGL is supported by all recent versions of popular desktop and mobile browsers, there may be [compatibility issues with old browsers](https://caniuse.com/#search=webgl).
## Exporting for the player
The Spine Web Player can display Spine skeletons exported from the Spine Editor in the `JSON` format.
In addition to the exported `.json` file, the player also requires a texture atlas consisting of a `.atlas` file and one or more `.png` files. Please see the Spine User Guide on how to [export skeletons to `JSON`](/spine-export) and how to [export a texture atlas](/spine-texture-packer) for more details.
We will use the [Spineboy project](/spine-examples-spineboy) for all examples below, for which the export creates the following files:
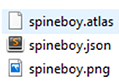
These files must be uploaded to a web server and accessible via URLs.
> The `.png` files need to be accessible under the same path as the `.altas` file. For example, if the `.atlas` file is accessible via `https://mysite.com/assets/spineboy.atlas`, the `.png` file(s) must be accessible via `https://mysite.com/assets/spineboy.png`.
## Embedding a player
Adding the player to your website consists of a few simple steps, detailed below.
### Adding the JavaScript & CSS files
The Spine Web Player consists of two files: `spine-player.js` and `spine-player.css`. The JS file contains the JavaScript code required for the player functionality, while CSS file defines the CSS for the player's UI.
The two files can be added to a web page like this:
```
```
In the above example, the two files are loaded from [UNPKG](https://unpkg.com/), a fast NPM CDN. The URLs contain a version number (`4.2`) which must match the Spine editor version you used to export your skeleton and atlas. Loading the files like shown above will ensure that your Spine players always use the latest JavaScript code and CSS.
Use the `.min.js` and `.min.css` file extension for minified files on the UNPKG CDN:
```
```
If you don't want to use UNPKG then you can host the files yourself by downloading them from UNPKG or by building them from the sources provided on our [GitHub repository](/git/runtimes/spine-ts). There you will also find instructions on how to use the Spine Web Player together with NPM or Yarn.
### Creating a container element
The player requires an element into which it should be loaded. The easiest way to do this is to create a `div` element with an `id`:
```
```
### Initializing the player
For the final step, the player needs to be initialized with a short JavaScript snippet:
```
```
This creates a new `SpinePlayer` in the `player-container` element. The player loads the Skeleton `.json` from the relative URL `/files/spineboy/export/spineboy-pro.json` and the `.atlas` file from `/files/spineboy/export/spineboy.atlas`. This particular texture atlas has one page named `spineboy.png`, so that image is loaded relative to the `.atlas` file, from `/files/spineboy/export/spineboy.png`.
The `scale` should match the [scale](https://esotericsoftware.com/spine-texture-packer#Scale) used to export the texture atlas. It can be omitted if 1.
### Putting it all together
!!
> The code in the player above is editable! Use it to experiment with the configuration options explained in the next section.
With the above code, the player will choose default values for all its configurable properties: which animation to play, the background color, and many more. You can further customize the player's appearance and behavior through the configuration detailed below.
## Configuration
The Spine Web Player offers a wide variety of configuration options to adapt it to your requirements.
### JSON, binary, and atlas URL
We have already encountered the two mandatory configuration properties `skeleton` and `atlas` in the example above. They specify from where the player should load the skeleton `.json` or binary `.skel`, and `.atlas` files. You can specify relative or absolute URLs:
```
```
> When using absolute URLs to another domain, it is possible that web browsers won't be able to load the assets. This is usually due to not having [CORS](https://developer.mozilla.org/en-US/docs/Web/HTTP/CORS) enabled on the server that hosts the assets.
### Embedding data
Instead of loading data from URLs, you can also embed the raw `.json/.skel`, `.atlas`, and `.png` files directly in the JavaScript sources. Use the `rawDataURIs` configuration property:
```
new spine.SpinePlayer("player", {
skeleton: "raptor-pro.json",
atlas: "raptor-pma.atlas",
rawDataURIs: {
"raptor-pro.json": "data:application/json;base64,",
"raptor-pma.atlas": "data:application/octet-stream;base64,",
"raptor-pma.png": "data:image/png;base64,"
}
}
```
`rawDataURIs` can also be used to use atlas images from a different path or (if CORS is enabled) a different domain.
```
"raptor-pma.png": "https://example.com/assets/raptor.png"
```
### Default animation
By default, the player will play the first animation found in the skeleton. The default animation can be set explicitly in the configuration instead:
```
```
### Limiting the animations
The player allows a user to select the active animation. The set of animations that can be chosen can be limited via the `animations` property:
```
```
The animation button will be hidden by the player if only one animation can be chosen, either because there is only one animation in the skeleton, or because the list of `animations` only contains one animation.
### Default mix time
When a user switches between two animations, the player will mix the animations for `0.25` seconds by default, displaying a smooth transition. This mix time can be set via the `defaultMix` property:
```
```
### Default skin
By default, the player will use the default skin of the skeleton, which only has the attachment that are not in a skin in the Spine editor. The active skin can be set explicitly in the configuration via the `skin` property:
```
```
### Limiting the skins
The player allows a user to select the active skin. The set of skins that can be chosen can be limited via the `skins` property:
```
```
The skin button will be hidden by the player if only one skin can be chosen, either because there is only one skin in the skeleton, or because the list of `skins` only contains one skin.
### Premultiplied alpha
By default, the player loads images with [premultiplied alpha](/spine-texture-packer#Settings) enabled. To disable premultiplied alpha, the `premultipliedAlpha` configuration property must be set:
```
```
> We recommend using premultiplied alpha with all assets displayed by the Spine Web Player. It reduces artifacts and seams that may be visible when not using premultiplied alpha.
### Hide controls
The player controls can be hidden via the `showControls` configuration property:
```
```
### Control bones
The player allows specifying bone names in the `controlBones` array to enable manual movement by dragging. A semi-transparent red circle is shown as a handle on each listed bone.
```
```
### Disable interactions
The player captures click and touch events for play/pause and bone control. To disable all interactions and prevent event consumption, set `interactive` to `false`.
```
```
### Debug visualizations
By default, the player does not show any debug visualizations like regions, mesh triangles, bones, etc. These can be enabled manually by the user via the player controls. The `debug` property can be used to specify which debug visualizations should be enabled by default:
```
```
Of course, you can omit any visualizations you do not want to enable by default, or set their respective property to `false`.
### Background color
The player background color can be set via the `backgroundColor` configuration property. The color must be specified as a hexadecimal RGBA color (`#rrggbbaa`).
```
```
The player can be expanded to fullscreen by the user. A separate background color for fullscreen mode can be set via the `fullscreenBackgroundColor` configuration property. If not specified, the fullscreen background color will be the same as the `backgroundColor`.
```
```
### Background image
Instead of a plain background color, the player can also display a background image behind the skeleton. The image can be specified via the `backgroundImage` configuration property:
```
```
The `url` is a relative or absolute URL to the background image. The `x` and `y` properties specify the position of the bottom left corner of the image in the skeleton's world coordinate space. The `width` and `height` properties specify the dimensions of the image.
### Translucent player
By default, the player is opaque and will be drawn over any other HTML elements behind it. The `alpha` configuration property can be used in combination with the `backgroundColor` property to make the player translucent, allowing any HTML elements behind to be seen through the player.
```
```
### Viewports
The player always tries to fill the container element it is embedded in. When an animation is chosen (or specified in the configuration), the player ensures the animation is fully visible inside the available player space.
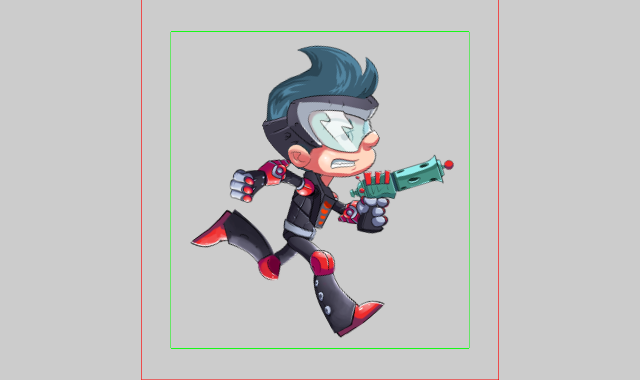
In the above image, the green rectangle represents the bounding box automatically calculated for Spineboy's `run` animation. It is padded by 10% on each side by default. The resulting viewport, indicated by the red rectangle, is then embedded in the available space of the player, retaining the viewport's aspect ratio.
This automatic viewport mechanism can be customized via the player configuration. If no viewport configuration is given, the player defaults to the automatic behavior described above.
You can set a **global viewport**, used for all animations, like this:
```
```
The `x` and `y` properties specify the position of the bottom left corner of the viewport in the skeleton's world coordinate space. The `width` and `height` properties specify the dimensions of the viewport. If any of these properties is omitted, the player ignores all other properties and resorts to the automatic behavior described above.
The `padLeft`, `padRight`, `padTop`, and `padBottom` properties specify the padding to be added to the respective sides of the viewport. In the example above, they are expressed as percentages. You can also specify absolute numbers in the skeleton's world coordinate space instead. If one of these properties is omitted, the player assumes a default value of `10%`.
When `clip` is `true` (v4.3+), the skeleton won't be drawn outside the viewport bounds. This is much more efficient than using a clipping attachment to do the same. The default is `false`.
You can **visualize the viewport** as in the image above by specifying the `debugRender` property:
```
```
When the player switches between animations, it interpolates the viewports of the old and new animation for `0.2` seconds. This **viewport transition time** can be set via the `transitionTime` property:
```
```
It is sometimes helpful to **specify a viewport for a specific animation**. This can be done via the `animations` property:
```
```
In the above example, we specify a viewport for the `walk` and `run` animations. For the `walk` animation, we define the complete viewport bounds including padding. The global viewport (or the automatic behavior if no global viewport is given) will be completely overwritten for this animation.
For the `run` animation, we only specify the top padding. All other viewport values will be either derived from the global viewport, or from the automatic behavior.
## Lifecycle callbacks
The player provides optional callbacks to hook into the loading lifecycle and the render loop. All callbacks receive the `SpinePlayer` instance as their first argument.
The following example shows all available callbacks at a glance:
```
```
While assets are being loaded, the `loading` callback is invoked each frame. Its `delta` is the raw frame delta, not affected by pause or speed. Once loading completes, either `success` or `error` is called. On success, the player's `skeleton` and `animationState` properties become available and the render loop begins. Each frame, the following callbacks are invoked in order: `frame` → animation update → `updateWorldTransform` → `update` → draw skeleton → `draw`. Their `delta` parameter is in seconds, already scaled by the player's speed and pause state (it is `0` when paused).
| Callback | Parameters | Description |
|---|---|---|
| `loading` | `player`, `delta` | Called each frame while assets are still being loaded, before the skeleton is available. The `delta` is the raw frame delta (not affected by pause or speed). Use this to implement custom loading indicators. |
| `success` | `player` | Called when the skeleton and its assets have been successfully loaded. The player's `skeleton` and `animationState` properties are available from this point on. If an animation is set on track 0 inside this callback, the player won't set its own default animation. |
| `error` | `player`, `reason` | Called when the skeleton could not be loaded or rendered. The `reason` parameter is a human-readable error message. |
| `frame` | `player`, `delta` | Called at the start of each frame, before the skeleton is posed or drawn. Use this to run custom logic before the animation state is updated. |
| `updateWorldTransform` | `player`, `delta` | Called instead of the default `skeleton.updateWorldTransform(Physics.update)`. Use this to customize how the world transform is computed, for example to use a different `Physics` mode. If not set, the player calls `player.skeleton.updateWorldTransform(spine.Physics.update)` automatically. |
| `update` | `player`, `delta` | Called after the skeleton is posed each frame (after `updateWorldTransform`) but before it is drawn. Use this to inspect or modify the skeleton's state before rendering. If you modify the skeleton here, call `player.skeleton.updateWorldTransform(spine.Physics.none)` to make the changes effective. |
| `draw` | `player`, `delta` | Called after the skeleton is drawn each frame. Use this to perform custom rendering on top of the skeleton using the player's `SceneRenderer`. |
## Advanced playback
The player provides the function `setAnimation(name: string, loop: boolean)` to set an animation by name and specify whether it loops. This function adjusts the [viewport](#Viewports) based on the animation specified.
`setAnimation` cannot be called until after the [`success`](#Lifecycle-callbacks) callback is invoked, which happens as soon as the atlas and skeleton data are loaded.
```
```
For more control, the player's [Skeleton](/spine-api-reference#Skeleton) and [AnimationState](/spine-api-reference#AnimationState) can be accessed directly to set attachments on the skeleton, change the skeleton's skin, queue animations, play multiple animations at once on different tracks, and [more](/spine-applying-animations). The player provides `skeleton` and `animationState` properties:
```
```
When accessing these properties directly, it is recommended to use `showControls: false` so that the controls don't interfere with the configuration set by your code.
By default the [viewport](#Viewports) is based on the skeleton's bounds in the [default animation](#Default-animation). Unlike the player's `setAnimation` function, the viewport remains the same when the animation state is used to change the animation.