!!
#Mix-and-match
The mix-and-match project makes use of many Spine features, including [skins](/spine-skins), [skin bones](/spine-skins#Skin-bones) and [constraints](/spine-skins#Skin-constraints), [meshes](/spine-meshes), [IK](/spine-ik-constraints), [transform constraints](/spine-transform-constraints), and [path constraints](/spine-path-constraints).
Many applications and games allow their users to create custom avatars out of many individual items, such as hair, eyes, pants, or accessories like earrings or bags. The mix-and-match project shows some best practices for such scenarios.
## Skins
The project contains many separate skins, each representing an individual item like pants or a bag, to facilitate the creation of custom avatars at runtime.
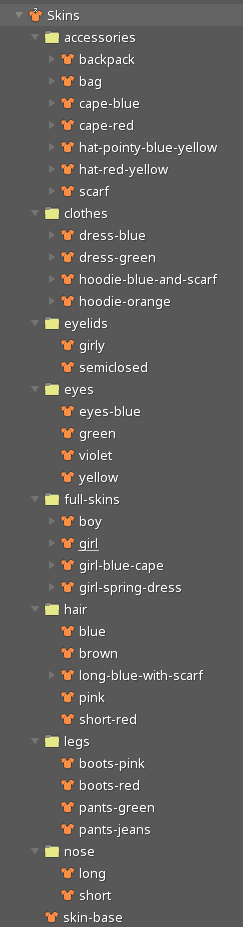
Folders are used to organize the skins making up the items that compose a character.
Some items, like the dress, contain skin bones and constraints.
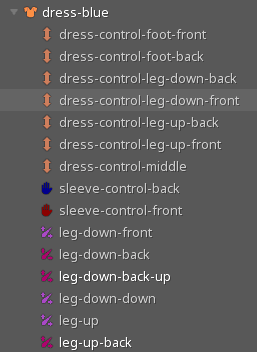
These skin bones and constraints are only active when a skin that contains them is active. Inactive bones and constraints can be hidden in the tree and viewport.
Various skin combinations can be viewed by pinning the desired skins in the [Skins view](/spine-skins-view).
The character was originally designed in Photoshop and brought into Spine using the [PhotoshopToSpine](https://github.com/EsotericSoftware/spine-scripts/tree/master/photoshop) script. New items can be added to the Photoshop file, exported using the script, then imported and added to the Spine project, making it easy to add more items over time.
##Face control
The 2.5D effect on the face is the result of several bones and meshes being influenced by two main bones, `head-back-control` and `head-control`, where one is constrained to the other using a [transform constraint](/spine-transform-constraints) with a translate mix set to `-100`.
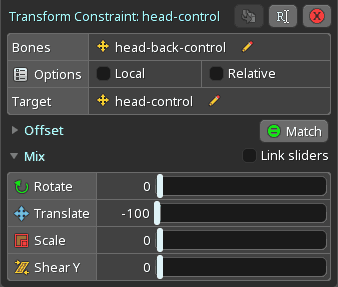
This results in the target bone moving in the opposite direction of the other when applying translation.
Weighing a mesh to these two bones that move in opposite directions makes it possible to add a depth effect, as illustrated in the [Cube tip](/spine-tips.php#6-cube2).
Additional depth is added by constraining bones for eyes, mouth, nose, and other facial features to the bone `head-control` as well. Using a lower translate mix, for example `20`, lets these bones follow the target bone at a slower speed, producing slight drag to emphasize the depth of the face. The same method is applied for the hair around the face and the hat.
##Bendy limbs
The character's limbs use the same rigging process used for the [Stretchyman project](/spine-examples-stretchyman). Images making up the limbs were drawn straight to facilitate nicer bending in Spine.
##Bag
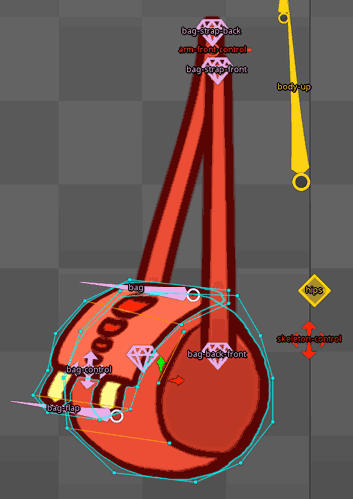
The bag is composed of 4 images and 7 bones. The `back-strap-back` and `bag-strap-front` bones are parented to the `arm-front-control` bone, keeping each strap of the bag attached to the shoulder. The meshes under the `bag-strap-back` and `back-strap-front` skin placeholders are weighted to these bones to stay properly in place relative to the shoulder.
Similarly, the bones `bag-back-down` and `bag-back-front` keep the straps attached to the bag itself through mesh weights.
The `bag` bone is the parent of all the other bag bones and controls the rotation and overall position of the bag.
The `bag-control` bone is used to add depth to the bag. The meshes under the `bag-base` and `bag-top` skin placeholders are weighted to this bone in such a way that moving the bone will distort the meshes to simulate perspective. To make the effect easier to control the bone is positioned at the point that is furthest away in the perspective view of the bag. To complete the illusion of depth, the `back-bag-down` bone, which controls parts of the back strap, is also parented to the `bag-control` bone.
Occasionally the flap of the bag needs to detach from the rest of the bag. This secondary motion is added through the `bag-flap` bone, to which the `bag-top` mesh is weighted.
The front circular side of the cylindrically shaped bag acts as a pivot for the perspective distortion. All the involved meshes have been weighted in such a way that parts of the bag further away from the viewer move faster than those closer to the viewer.
The `bag-top` mesh follows a similar logic regarding its perspective distortion. The `bag-flap` bone influences the lower parts of the `bag-top` mesh the most, while the `bag-control` bone influences the top left portion of the flap the most.
An important aspect is the order of the bones used for weighting the `bag-top` mesh, as can be seen in the [Weights](/spine-weights) view. This ensures that the triangles most influenced by the `bag-flap` bone are drawn on top of triangles most influenced by the `bag-control` bone. Controlling the triangle draw order allows for a wider range of movement without incorrect overdraw.
##Backpack
The backpack is composed of 5 images influenced by 4 bones. The `backpack` bone controls the overall rotation and position of the backpack. The `backpack-control` bone is used to add depth to the backpack.
The meshes `backpack-strap-front` and `backpack-strap-back`, which make up the straps of the backpack, are weighted to the `backpack` and `backpack-control` bone to add perspective distortion. These two meshes are also weighted to the `arm-front-control` and `arm-back-control` bones respectively to keep the straps attached to the shoulders.
The remaining three meshes under the `backpack` bone (`backpack`, `backpack-pocket`, and `backpack-up`) are also influenced by both `backpack` and `backpack-control` bone to add perspective distortion.
To add perspective distortion, vertices closer to the viewer are more heavily influenced by the `backpack` bone, while vertices farther away from the viewer are more affected by the `backpack-control` bone. The `backpack` bone serves as a pivot, while the `backpack-control` bone controls the amount of perspective distortion.
In order to allow viewing the backpack slightly from the top, a mesh called `backpack-up` was added. In the setup pose, this mesh is drawn behind the `backpack` mesh. By moving the `backpack-control` bone up and down, the top of the backpack made up of the `backpack-up` mesh can be seen. This adds additional plasticity to the backpack.
Placing such elements hidden in the setup pose can be cumbersome. Instead, the `backpack-control` bone was moved to a position where the `backpack-up` mesh should be visible in animate mode. Next, [Update bindings](/spine-weights#Update-bindings) was used to bind the mesh to the bone, without having to edit the setup position of the bone.
##Hat
The skeleton includes two differently styled hats. Since their setup is the same, we'll only review one of them here.
The hat consists of one mesh and 3 bones. The `hat-base` bone allows to move the hat independently. The `hat` bone bends the hat, while the `hat-control` bone add depth and slightly follows the 2.5D face control.
To create an easily bendable hat, the `hat` mesh was divided into horizontal rows with 5-6 vertices. This creates a conical topology with just enough vertices to be able to model realistic bending and distortion.
The `hat` mesh is bound to all three bones making up the hat. The top vertices are mostly influenced by the `hat` bone, while the bottom vertices are mostly influenced by the `hat-base` bone. Depth is added to the center vertices, which are mostly influenced by the `hat-control` bone.
##Red cape
The red cape illustrates how to create a flexible rig that follows body motions, while making it easy to add secondary motion, all without cumbersome manual mesh deformations or bone transformation keying.
The cape is composed of 2 meshes, 1 region, and 10 bones. The two meshes make up the shoulder parts of the cape. The region constitutes the ribbon.
Special care was taken to ensure easy control of the meshes' deformation behavior. The lace at the bottom is partitioned into a strip of 5 sections, preserving the shape of each individual part. For better deformation behavior of the vertices at the top edge, a vertex was placed to match the position of the shoulder bone. The lowest edge of the outer part of each mesh is also divided into 3 sections to smooth the bending where most of the secondary motion will take place.
The mesh `cape-red-up` is bound to four bones: `body-up` for the parts that don't need to move because they are attached to the body, `cape-red-front-outside` to control most of the secondary motion, `cape-red-front-inside` to control the inner part of the cape separately, and `shoulder-front` to fix the shoulder rotation. The same approach is used for the `cape-red-down` mesh.
The `cape-red-front-outside` bone is parented to the `cape-front-rotator` bone, which itself is parented to the arm and is not directly bound to the mesh. Big movements of the cape are created by rotating this bone. Small adjustments that can be skin-specific are done via the `cape-red-front-outside` bone.
Additionally, the bone `shouder-front-transform` and its child `shoulder-front` help the cape mimick the rotation of the arm. This is done through the transform constraint `shoulder-front`. Without this constraint, rotating the arm all the way up causes the shoulder to enter the body instead of creating volume from the contraction of the muscle. See the [shoulder tip](/spine-tips.php#4-shoulder) for an alternative way of handling shoulder rotation.
##Blue cape
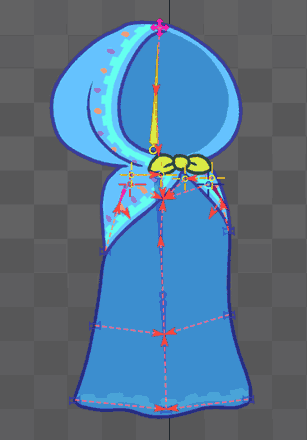
The blue cape is composed of 6 meshes and 16 bones.
The upper part is composed of 2 meshes: `cape-blue-up-front` and `cape-blue-up-back`, which are influenced by the `body-up` bone to keep them in place at the bottom, by the `head` bone in the mid-section, and by the `cape-control` bone at the top of the head to allow the cape some freedom of movement. The influence of the `head-control` and `head-back-control` bones adds depth to the cape. To guarantee a nice seam between the top parts of the two meshes, each mesh has vertices at the same location and with the same weights as the other mesh.
The shoulder parts of the blue cape follow the same principle that was applied to the red cape: big movements are created through the `cape-front-rotator` and `cape-back-rotator` bones, while smaller adjustments are done through the `cape-blue-up-front` and `cape-blue-up-back` bones. The shoulder parts stay attached to the body by being bound to the `body-up` bone.
The part of the cape that covers the back of the body has 3 bones in the middle: `cape-blue-up`, `cape-blue-down`, and `cape-blue-down-middle`. The bones get progressively smaller from top to bottom. These bones control the overall shape of the cape. Each of the 3 bones controls two bones to the left and right of themselves. These bones on the side help to retain details along the border regions of the cape.
##Blue dress
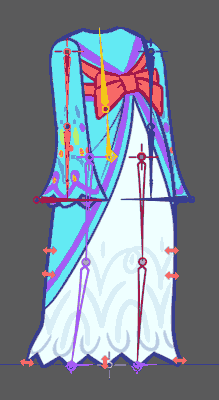
The long dress consists of three meshes: `body-dress`, `sleeve-front`, and `sleeve-back`. The upper half of the `body-dress` mesh is weighted to the `body-up` bone to stay attached to the upper body. The lower half is bound to a series of smaller bones, all parented to the `skeleton-control` bone. These smaller bones follow the legs of the skeleton through a series of transform constraints.
As with other clothing items, having a separate set of bones to control the dress makes animating follow-through and secondary motion a lot easier. Instead of having to manually animate every single weighted bone, adjusting the mix of a constraint is generally enough to achieve effects like following or ignoring the movement of the skeleton's leg bones.
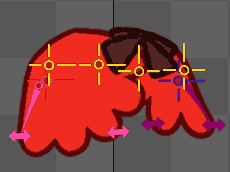
##Green dress
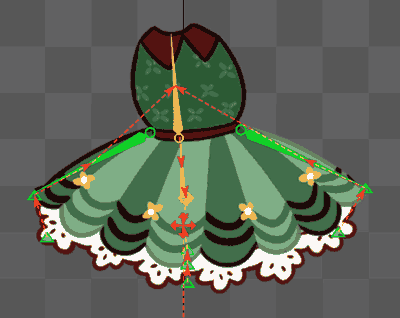
The green dress is made up of 2 meshes for the 2 skirt layers, and an image for the top body part. The general movement is done through the `body-down` and `body-up` bones, which serve as the parents for skirt-specific bones.
Two long bones on the left and right side of the skirt, `skirt-rotation-front` and `skirt-rotation-back`, are responsible for big skirt movements. However, they are not directly bound to the meshes of the skirt. Instead they serve as the parents for bones like `skirt-control-front` and `skirt-control-back`. These are used for secondary motion and are weighted to vertices on the left and right sides of the mesh. The mid-section of the skirt is weighted to the `skirt-control-up` bone for additional secondary motion. The top part of the skirt is mostly weighted to the `body-up` bone to keep the skirt attached to the body.
The underskirt should mostly follow the skirt layer on top of it, but it also requires additional controls to add a layered feeling to the skirt. This is achieved by weighting the underskirt mesh to the `skirt-control-back-down`, `skirt-control-front-down`, and `skirt-control-middle` bones, which are children of the `skirt-control-back`, `skirt-control-front`, and `skirt-control-up` bones. Through this setup, the underskirt generally follows the upper skirt, but it also grants control for exaggeration through its own set of secondary motion control bones.
##Videos
You can follow the creation of this project in the videos below. A full index of the streams and the original project files can be found in our [Spine Twitch archives](/spine-twitch.php).
The project file that you can download from this page as well as being shipped with Spine is an enhanced version that makes use of new Spine Editor features such as skin bones.
[youtube:a4JG9AdIw2s]
[youtube:0yEIMe7WAO0]
[youtube:NJ4AIxdW4Ts]
[youtube:zz4JS0z6KgY]
[youtube:dDkIL9Xwm5E]